Tuesday, February 28, 2017

A&C GP35's

I've been working on a pair of N scale GP35's for myself over the last 6 months or so and I am finally done with detailing and ready for paint.

The A&C rostered three GP35's, two of which were originally B&O units and 1 was an SP unit.  I chose to model the SP unit, but instead of a single unit, I am modeling two, both to practice my skills and because there is a lot of character in the SP units. The models are older Atlas/Kato units.

Details are numerous on these units.  For starters, I scratchbuilt the SP light cluster on the rear of the long hood and plated over the top two light positions. On the nose of the unit, I cut into the nose and scratchbuilt the light cluster there. I also plated over the cab headlight. On the pilots, I removed the stock details for the kickplates and added a plain plate all the way across.  I also added angle stock to simulate the angle that is found above the MU hoses on the prototype locomotives. I drilled holes for all of the grabirons which I form myself and install after paint and decals. Onto commercial details, on the top of the hood, I used BLMA etched fans and GMM lift rings. On the cab, I used a MBE top mount bell, an Atlas Leslie 3-chime horn, BLMA sunshades and GMM wipers.  I will also add wind deflectors to the cab from BLMA after paint and decals.  On the pilots, I added BLMA cut levers and MBE air hoses.  BLMA MU hoses will come after paint and decals. I also added the crossover steps and MU stands above the pilots on the walkways, both MBE parts. The last, and most time consuming detail, was the stanchions and handrails all the way around the model.  I make the stanchions out of 0.010x0.018 inch brass bar and the handrails from 0.008 inch phosphor bronze wire.  The stanchions are glued into the sill and the handrails are soldered to the stanchions.  This detail is very strong and makes a huge impression on the overall look of the locomotives.

I'm looking forward to getting paint on these and will update once I get there.

Thanks for looking!
Doug


A&C Alco Units

I finished up this pair of HO scale Alco units for a good friend that used to work for the railroad.  The A&C never had Alco's on the roster, but his favorite locomotive is the FA and I thought the paint scheme would look great on the body.

The models are Life-Like Proto 2000 units that came decorated for the Missouri Pacific.  After disassembly, they took an overnight bath in 91% alcohol to strip the paint.  I sprayed a base coat of Tru Color white and then it was off to masking.  The most difficult mask was across the cab doors and the curves on the nose.  I found inspiration for the nose curves from MKT Alco PA's. I shot the green next, Tru Color Reading Green, then unmasked and gave them a Future gloss clearcoat.  Decals came next, MicroScale produces a set for A&C units and I used the lettering, numbers and striping. I had to scrounge my decal box for the curved stripes on the nose as it's impossible to get a straight decal to curve more than a little.  Luckily I came across an N scale set for Lehigh Valley F units that had the same color and width of the A&C stripes and the curves were a fairly close match.  Lot's of MicroSol got the curves to massage into the perfect shape.  Another coat of clear came next to protect the decals and then it was time to reassemble. The last thing to do was detail paint for all the grab irons.  I also painted the cab interior that comes with the locomotives.

I hope you enjoy the pictures. These were fun locomotives to do and I think the scheme looks really sharp on the Alco bodies.

Thanks for looking!
Doug


Sunday, October 2, 2016

PLW gets a spray booth!

After a long time thinking about getting a spray booth, I finally bit the bullet, and built one from mostly recycled materials picked up at a Habitat for Humanities Restore.  Some recent spraying of HO units in the basement showed me just how much crap was lingering in the air and I decided it was time to look into a spray booth.  My father, who has also built and custom painted model cars and 1:1 cars his whole life, also encouraged me to get a spray booth, mentioning that he built his own.

I spent the last week Googling DIY spray booths and I saw a lot of alternatives, from building plywood boxes to using plastic storage totes.  I was looking for something that I could move around easily and tuck into the corner of the basement.  I also wanted the ability to close it up and keep my recently sprayed items protected from most of the dust in the basement.  I saw a build from a guy on a military modeling site who used an old wall hung cabinet.

The cabinet provides a prebuilt box with a door.  I picked one up at the Restore that felt the right size, along with a bathroom vent fan.  I looked for a light but could not find one, so had to resort to new from Home Depot there.  Once home I located the fan on the top of the cabinet, offset to the left as I spray with my right hand.  I cut a large hole in the top for the fan to suck up the overspray.  I added a couple of 2x4 to the side of the cabinet near the top to hold a furnace filter, as well as a piece of 1x4 screwed to the bottom of the 2x4's to place a closet lamp.  With the box basically built, I proceeded to wiring.

The wiring was pretty easy, especially if you have ever installed a light in your home.  I screwed a junction box to the side of the cabinet so that I could have switches for both the light and the fan.  A replacement cord for power tools provided a plug and the three wires needed for all wiring.  Using the power cord lets me place the spray booth anywhere I want with an outlet in reach and makes it very easy to wire the junction box.  Inside the junction box is your typical wiring with hot, neutral and ground, pigtailed appropriately for the switches.  The wires then run to each the light and fan.

I tested the booth out today by spraying three Walthers N scale coil cars.  Everything was nice and bright in the booth and the fan worked wonderfully.  I think I could use a little extra air movement out of the fan as it's only 50cfm, but in the tight space of the cabinet it worked pretty well.  I need to paint the inside of the cabinet white to make it a little bit brighter.

Overall this was a quick and easy project and works very well for my needs.  For less than a $100 and a couple hours work, I've got a great spray booth to work in.


Rock Island Covered Wagons

Just finished up a few Rock Island units for a friend in Nebraska.  These came to me as undecorated Kato units with details added by the owner.  These were pretty straight forward units but did require some interesting masking on the noses.  We used Tru Color paints and Microscale decals with a Future clearcoat before applying decals.

First of the three was F7A #122 in the red/yellow scheme.  The owner added the spark arrestors and a small radiator on the top of the hood.  He also filled in the lower headlight.  This model was first based in red paint, then masked for the yellow nose and stripes.  Decals followed including the yellow stripes on the door grabs.


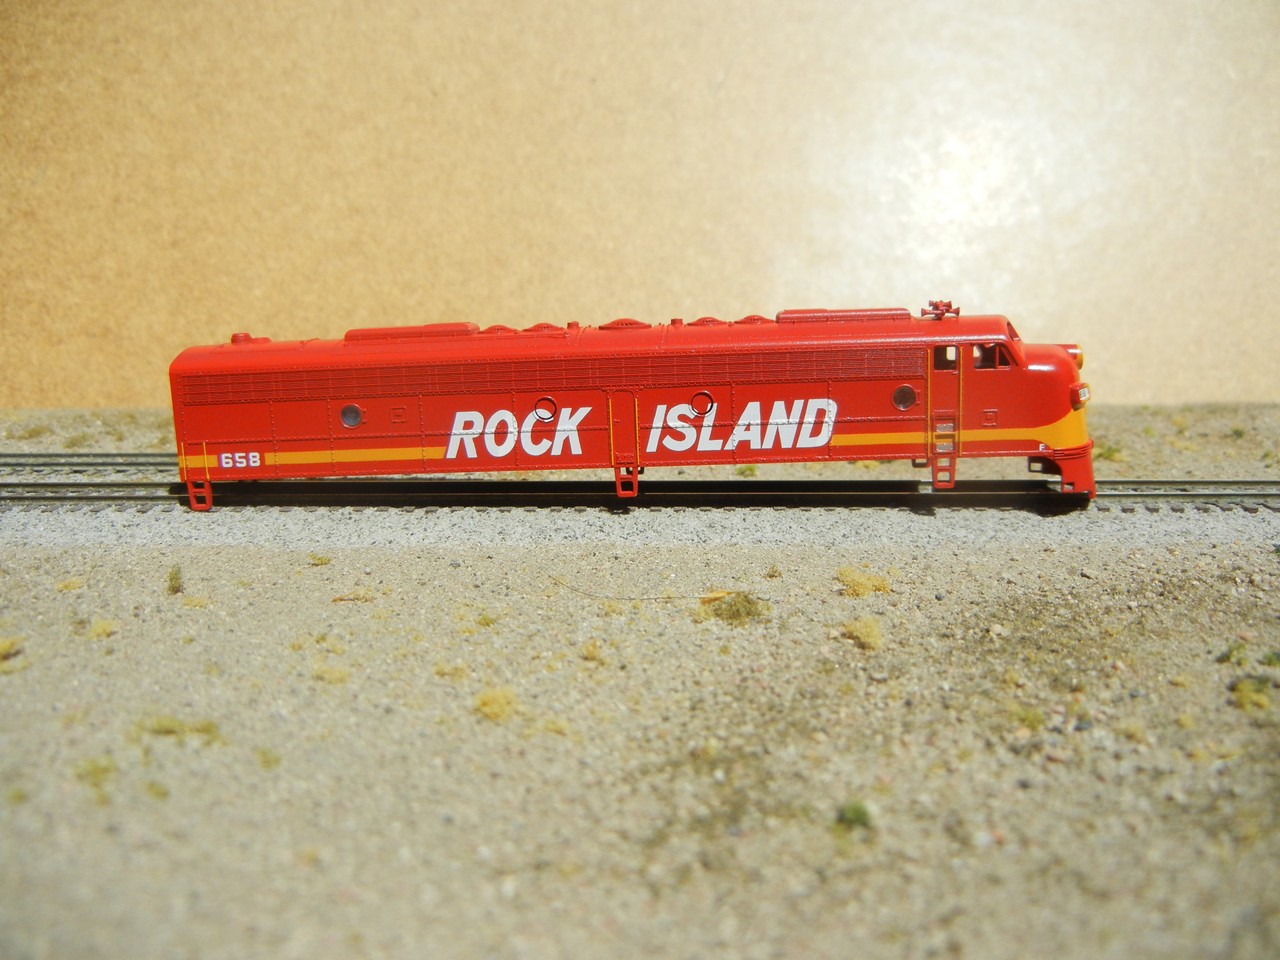
Second is E8A #658, also in the red/yellow scheme.  I grafted large numberboards to the nose from a donor F7 model to match the prototype 658.  This model was painted and decaled in the same manner as #122.


Last is E8a #649, this one is in the maroon/yellow scheme.  This model was stock straight from Kato and only got paint and decals.  The yellow nose was sprayed first to ease the masking and then the model was finished with maroon.  Decals followed including the yellow stripes on the door grabs.


These were fun units to do and were a real challenge to mask.  I used a lot of decal solution to get the large Rock Island letters to settle down over the rivets on the body panels.  Photos of the assembled units can be seen over on the owner's blog. thelittlerockline - covered wagons on little rock

Thanks for looking!
Doug

Monday, March 7, 2016

GP7 C&S 9273

This locomotive began life as an Atlas unit decorated in the EMD demonstrator scheme.  It was a very straightforward repaint with no additional details.  The unit was sprayed grey to begin with and then masked for the black.  Decals followed including all of the striping, lettering and numbering.  Pollyscale paints and Microscale decals were used to complete the job.


Thanks for looking!
Doug